A properly made feeder is the key to successful pig farming for the farmer. Also, the correctness of their creation directly affects the laboriousness of the process of raising these animals.
Basic requirements for the product
Farmers should keep in mind that a well-made product dramatically reduces costs. After all, it is difficult to spill food out of a good feeder (and pigs love to do this), it will not rot, causing a leak of wet food and, most importantly, it will be extremely convenient to use.
Before you create a feeder, you should study the set of unofficial, but extremely important sanitary regulations, otherwise the animals will get sick, the products will break down, and the farmer's business will suffer losses on a huge scale:
1Feeders must be kept clean.
This is a key requirement, so it will be very important how easy it is to clean the feeders after the pig’s meal. The main thing is not only to be able to easily get to hard-to-reach places, but also high-quality cleaning of the product from food debris, other dirt, etc. So it is also worth paying serious attention to the material of the feeder.
2 Pigs should not be able to climb into the food compartment
This applies even to small piglets, otherwise they will deposit the products of their vital activity in the feed, add dirt or debris. And this means a 100% occurrence of bacteria, the presence of eggs of worms and much more.
A good way to protect the feeder from the penetration of pigs - competently treat the height of the front wall. Because of their short legs, pigs are not inclined to jump, so this approach will reduce the desire of boars to get into the feeder several times and arrange a mess there.
3 Feed must not spill
Therefore, it is necessary to make a certain depression in the trough and protect the food from the side walls from being scattered by animals. However, this is just an example, and a more accurate structure will be created already in the drawings.
It is also important to remember that liquid food compartments must be airtight. Leaking liquid will increase the humidity in the room. Such situations have a negative impact on the health of pigs, and, therefore, bring losses to the owner.
4 Pigs should have maximum access to feed.
A cut / beveled feeder will work well. A completely round feeder is the perfect solution.
However, problems with its stability may arise (there are not many ways to achieve this under such conditions). On the other hand, if the round feeding trough is stable, then it is most likely difficult. This means that it will be more difficult to wash, clean, transfer, etc.
5Other nuances
It is desirable that the trough is tilted. This will allow food debris to always accumulate in one place, and not be scattered over the entire area.
The product must be made of such material that it does not deteriorate from exposure to the sun and / or heat. There is nothing worse for animals than molten plastic or rusted metal. It is also important that no toxic substances are released during operation: this is critical for young piglets and sows.
The edges of the structure must be completely safe for animals. The probability of cutting is 100%, because pigs are not very neat animals, as well as clumsy.
Feeders, if used for different types of feed, should be divided into sections: for dry feed and for liquid. If you need to provide the pigs with drink, then for this you need to create separate structures - special drinkers.
The best solution would be such a size and type of construction so that several heads could feed at once. Also for small piglets and adult boars, pots of different sizes are needed.
It is not possible to raise a mature pig from a piglet using the same size feeder. There must be several of them: an adult cannot crawl into a small hole with its muzzle, as well as a small pig just cannot reach the food in a large vessel.
For piglets, you can make a feeder with a canopy: due to their small stature, they will have easy access to food, and adult pigs will not be able to do this.
Size required
To make a do-it-yourself pig feeder, you need to figure out the dimensions of the structure. They fluctuate greatly and depend on many factors:
- number of goals;
- type of pigs (piglets, adult pigs, sows, young animals, etc.);
- the breed of pigs (directly affects the size and height of the sides in the feeders);
- the size of the room where animals are bred, etc.
On average, it is recommended to focus on such sizes width in the feeders:
- adult pigs: 500 mm for dry feed, 400 mm for liquid;
- weaned piglets: 300 mm for dry food and 250 for liquid;
- suckling pigs: 150 mm for all types of feed with a headboard height of 100 mm.
Concerning lengths, it depends on the age of each individual:
- sucking piglets - 150 mm;
- young growth up to 5 months - 250 mm;
- young growth from 5 months - 300 mm;
- sow - 400 mm;
- adult boar - 450-500 mm.
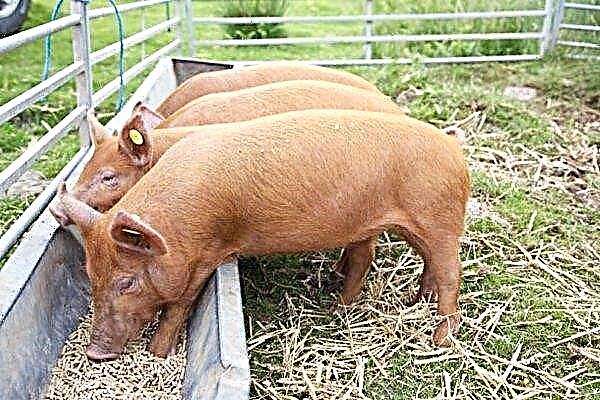
For a large number of goals, it is best to make one long feeding trough. This will ensure continuity of nutrition and ease of feed consumption.
Wooden trough for pigs
One of the most sustainable materials for making a feeder is wood. It does not require large financial costs, and you can do with a minimum of tools.
Boards can also be used in the third grade, since the wooden trough is disposable - literally for the lifetime of one pig, that is, from 7 months to a year. In order to ensure disinfection, such a trough is then burned. A new trough is made for a new pig.
The main disadvantage of wooden feeders is poor moisture resistance.
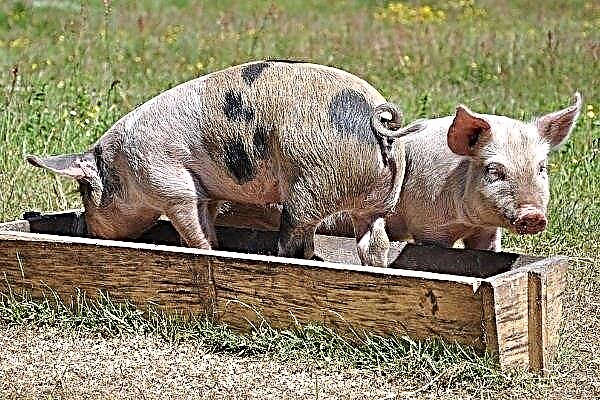
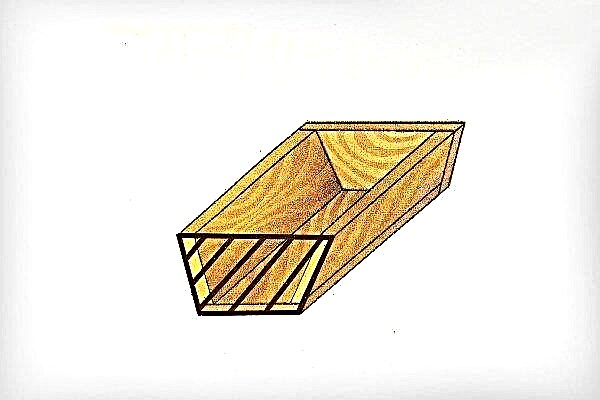
The first version of the wooden trough
To make a wooden trough you will need:
- front and back wall: board 1 m long, 20 cm wide and at least 3 cm thick - 2 pcs.;
- side walls: board 40 cm long, 20 cm wide and at least 3 cm thick - 2 pcs.;
- bottom: board 1 m long, 25 cm wide and at least 3 cm thick - 1 pc .;
- screws, nails;
- screwdriver, hammer;
- saw (circular or manual), jigsaw, jointer, plane and the like.
Here is a drawing of the trough with dimensions (in mm):
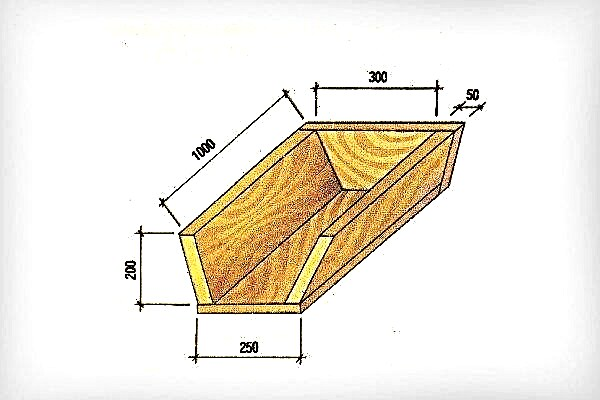
Work order:
- For boards designed for the front and rear walls, remove the kerchiefs from the longitudinal ribs to get beveled corners.
- Attach the board that is intended for the bottom to the beveled cut of the side wall with the long side and secure with self-tapping screws. For greater strength, strengthen the product with nails.
- Screw the second (front) wall in the same way. The result will be a design resembling an inverted isosceles trapezoid in shape.
- Take one of the sidewall boards. Attach this board to the end of the previously obtained structure, and draw the outer contour of the trough. With the second board, do the same.
- Saw away the excess to get the exact parts.
- Install the end pieces and twist them with self-tapping screws. If you took the end boards wider, and they turned out to be higher than the trough, you can shape them with an arc by cutting with a jigsaw.


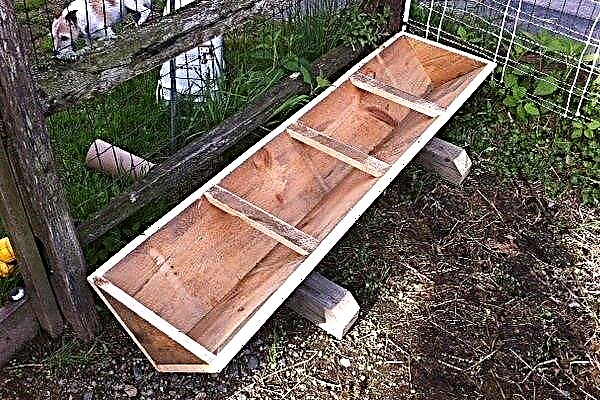
This trough is designed for 2 buckets of feed for two piglets. For added strength, fasten a cross bar in the middle.
You can learn more about the technology for making such a feeder by watching the video below:
To prevent the trough from leaking, during assembly, you can lay twine into the joints.
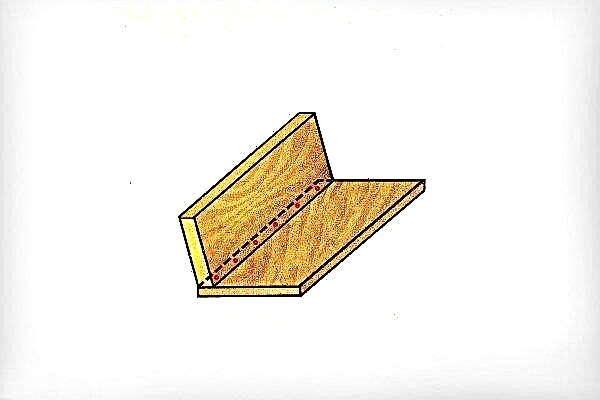
The second version of the wooden trough
The pig feeder can also be made of two boards connected at an angle:
You will need:
- 2 rectangular edged boards of the same length;
- 2 parts of a triangular shape, which will be the end walls of the trough;
- 3 bars with a section of 20x50 mm, equal in length to the width of the finished trough;
- 2 beams 50x100 mm for support.
Assembly sequence:
- Connect the two long boards so that they form a right angle. Secure with nails or screws.
- Fix the triangular parts from the ends of the trough, fix them with nails or self-tapping screws.
- For greater strength of the product, as well as as the upper limiters, fasten the crossbars at regular intervals, having previously decorated their ends at an angle of 45 degrees.
- Two beams can be used as a support. Saw out a groove under the trough in each of them. Place the trough on the supports.


The feeder is ready!
Plastic barrel feeder
Industrial companies purchase the necessary equipment and containers from suppliers, but you can make a feeder for a small number of pigs yourself.
And most importantly - completely free, not counting the tools. One of the simplest options is a plastic barrel feeder.
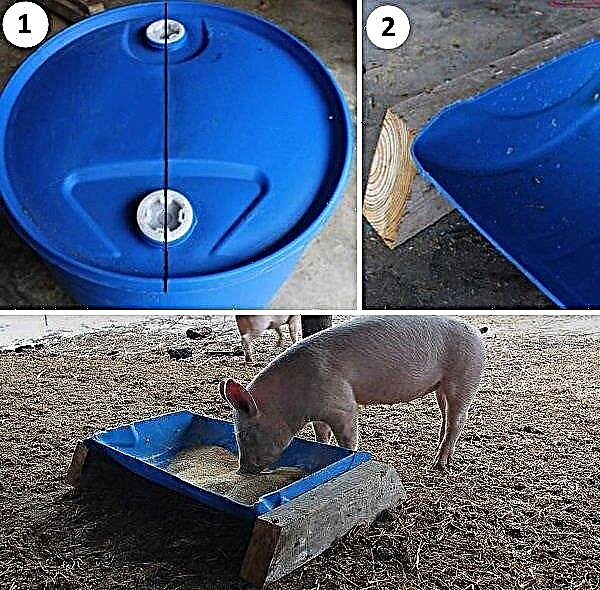
Using an unnecessary barrel, you can make an excellent pig feeder. However, first of all, you need to make sure that toxic and poisonous substances are not stored in the plastic barrel (it will be incredibly difficult to get rid of the chemical sediment). If the keg is food grade plastic, that's a huge plus.
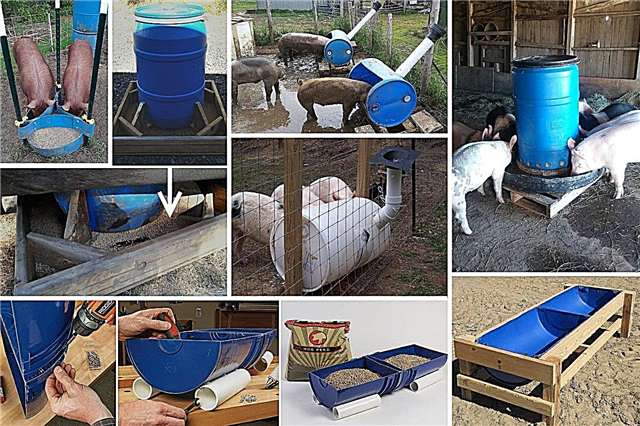
Manufacturing option
The scheme for creating a feeder is very simple and consists of a couple of actions that can be dealt with in literally 1-2 hours. For work you will need:
- marker and ruler;
- saw, jigsaw or grinder;
- wooden blocks;
- screwdriver and self-tapping screws;
- sandpaper.
Manufacturing process:
- Using a ruler and marker on the barrel, you need to mark.
- Using a saw, jigsaw or grinder, cut the barrel in half, according to the markings.
- The cut parts should be fixed with self-tapping screws on wooden blocks. This will seriously increase the stability of the future feeding trough.
- Sharp edges need to be sanded to prevent injury to animals.
Pros:
- the easiest way to make a pig feeder;
- minimum costs;
- simplicity and efficiency of use;
- easy to carry and clean.
Minuses:
- pigs can climb into a feeding trough without problems;
- very unstable;
- plastic can emit harmful gases under the influence of the scorching sun (you must be responsible when choosing a place for installing such a feeder).
Gas cylinder feeder
Another, similar to the previous, method of creating a feeding trough is from a gas cylinder. It is not in vain that this type of feeder has been brought to a separate point: in comparison with analogs made of plastic or wood, the cylinder consists of heavy-duty metal. Welded to an iron frame, such a structure will last 20 or even 30 years.
Required tools:
- grinder or hacksaw for metal;
- welding machine;
- other materials as required.
Manufacturing process:
- The first step is to open the valve fully to make sure there is no gas left in the cylinder.
In no case should this point be ignored, otherwise an explosion may occur when the container is cut. Observe safety precautions when creating feeders: even a piece of wood when working with a saw can fly off and fall into vulnerable places on the body (eyes, throat).
- Then the valve is cut from the cylinder using a grinder or a hacksaw.
- After the steps taken, you should fill the cylinder with water and rinse it in this way several times (in order to wash off the condensate). It is better to drain the water from the flushing in places remote from people and animals, because the condensate from the gas can have a rather bright and unpleasant odor. In order to protect strangers from poisonous vapors as much as possible, water can be poured directly into the sewer.
- Next, the gas cylinder must be cut with a grinder into 2 equal (for adults) or unequal (for boars and piglets, respectively) parts.
- Additionally, metal rods can be welded across the container - they will not allow pigs to get into the trough.
- To increase stability, it is enough to weld a metal (or knock down a wooden) frame.
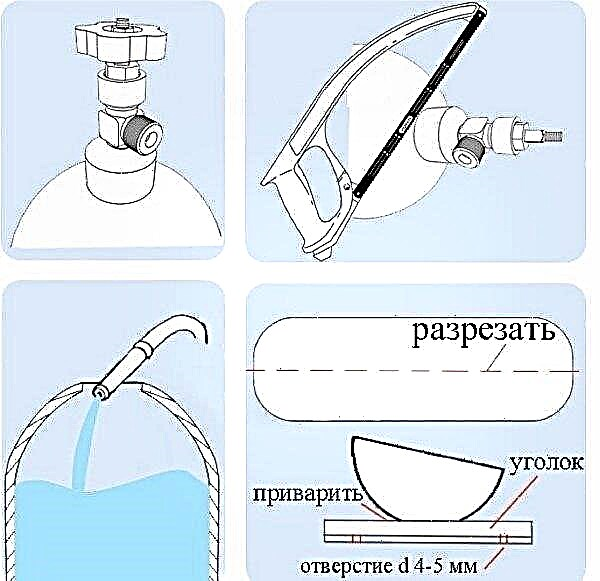
It is better to weld the feeder from a gas cylinder at a slight slope to make it easier for the pigs to consume the feed.
Another method of making a balloon feeder for pigs is shown in the video below:
Benefits:
- significant structural stability;
- durability;
- variability during creation (you can add or change many details without worrying that the structure will break);
- complete immunity to sun rays or excessively high / low temperatures.
Disadvantages:
- can rust if not taken care of cleaning;
- difficult transportation;
- without special skills, it will be extremely difficult to make such a feeder;
- at high temperatures, the metal heats up and can cause burns when touched (but when installed under a canopy, the problem is solved).
Such a feeder is a hopper for feed and a tray into which it will flow evenly. To make such a design is difficult. But the advantages of this bunker feeder is that:
- the farmer reduces time for servicing livestock (feeding occurs in a semi-automatic mode, as the feeder is replenished by itself, and the feed is refilled only if the hopper is emptied);
- metal is well washed and easily disinfected by special means.
The first version of the feeder
To make it you will need:
- 2 iron pipes with a diameter of 310 mm (or two old gas cylinders);
- 4 pieces of metal for making the ends of the trough;
- metal corner for legs;
- metal fittings for crossbars;
- Bulgarian;
- welding machine with electrodes.
Sequence of work:
- Cut one pipe, 1 m long, lengthwise into 2 equal halves.
- Place these halves side by side and weld them together along the long side.
- Cut out semicircles for the ends from separate metal sheets, weld them.
- For stability, weld the legs. They can be anchored to the floor so that the feeder does not move.
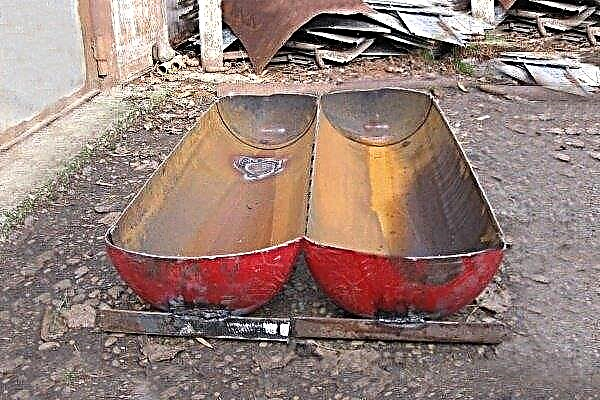
- Weld at the edges of the sides so that the pigs are not injured by sharp cuts while feeding, and also so that the pigs do not scoop up the feed from the feeder and spill it onto the floor.
- Place the second pipe vertically in the center of the weld seam of the halves of the first pipe.
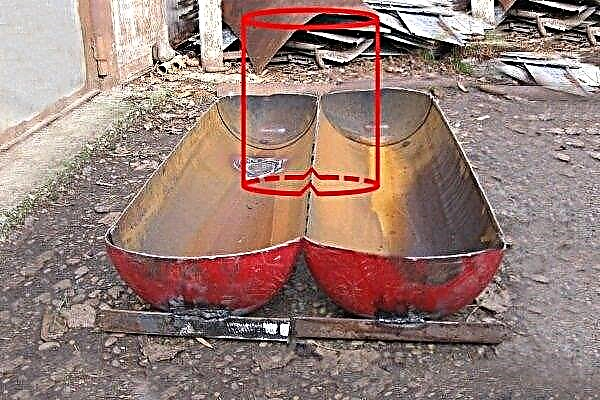
- Use a grinder to cut out the groove so that the second pipe "sits" on the partition. Weld on.
The size and shape of the groove can be used to regulate the feed to the trough. Choose the best option for yourself.
- To prevent pigs from getting into the trough, it is recommended to weld the transverse rods in the middle.


The following video shows a mini-version of such a feeder:
The second version of the feeder
Necessary materials and tools:
- steel or aluminum sheets about 3 mm thick;
- a metal pipe 1 m long and at least 60 cm in diameter, otherwise the container will be too small;
- Bulgarian;
- welding machine with electrodes.
Here is an example drawing of this feeder:
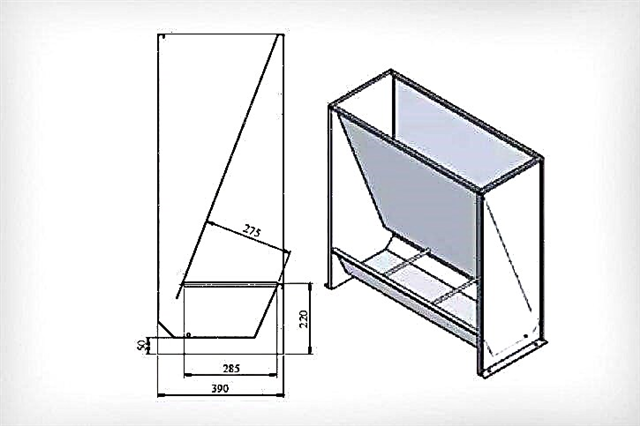
Stage 1. Make a metal trough:
- cut the pipe in half lengthwise;
- fasten the plugs from the ends by welding.
Stage 2. Next, make a hopper (it should hold at least 40 kg of feed). The walls of the bunker should be sloped so that the feed runs down them under its own weight:
- Using a grinder, cut out 4 parts for the hopper from a metal sheet according to the diagram.
- Weld 3 sides of the hopper.
- On the fourth wall, make a “cone” - a special rod that, when grazed by pigs, moves and breaks the packed food in the hopper:
- On the inner side of the wall of the hopper, in the center in the upper and lower parts, weld 2 nuts flat and face the nuts on them.
- Thread the reinforcement bar through the nuts.
- Weld on it 2 transverse segments.
- Bend the lower part of the reinforcement with a hook, it will be in the feeder.
- Assemble the bunker by welding the last, fourth wall with a cutter.
How the bunker is assembled is shown in the video below:
Stage 3. Connect the hopper to the trough by welding. Attach the feeder to the wall or floor, otherwise the pigs may knock it over. Done!
Ceramic tube feeder
Feeders from such pipes are not susceptible to corrosion and decay.
Materials and tools:
- ceramic pipe with a diameter of 450 mm;
- concrete: cement M500, sand and gravel in a ratio of 1: 2: 3;
- cement mortar: cement M500 and 5 buckets of sand;
- boards for molds for concrete supports;
- reinforcing bars with a diameter of 15 and 20 mm (for a protective lattice and holders respectively);
- 2 plastic pipe plugs (for example, external for transporting pipes with a diameter of 450 mm);
- Bulgarian;
- welding machine with electrodes;
- tape measure, marker for marking.
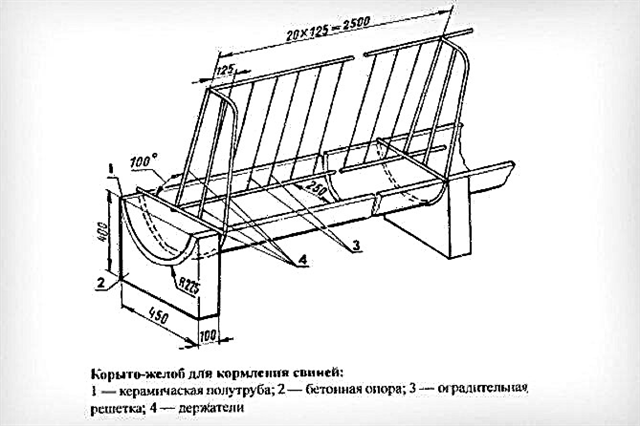
Dimensions in mm
Production Order:
- Carefully cut the pipe in half lengthwise.
- Cut from the sides along a ring 100 mm wide.
- Make two rectangular molds from wooden boards according to the dimensions shown in the drawing above, throwing 2-3 mm. Pour concrete into each mold, avoiding voids. To compact the mixture and get rid of air bubbles, you need to take a metal rod and "stick" the concrete over the entire area in steps of 5-10 cm.
Lay oilcloth on top, and lay the half-pipe ring. Press the ring to displace the excess concrete.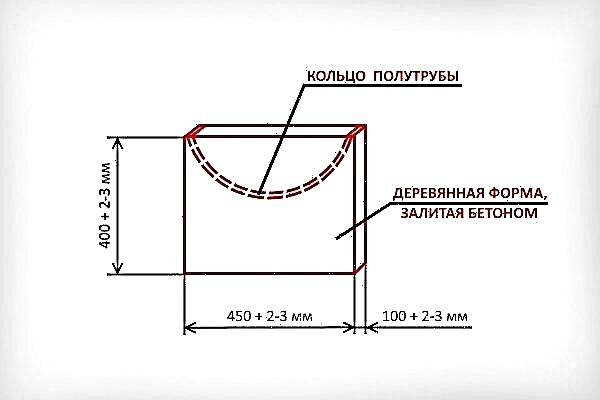
- After 1-2 days, as the concrete dries, remove the wooden formwork from the product.
- Install the half pipe on concrete supports.
The manufacture of supports can be simplified. Fill a sturdy plastic bag with concrete and tie it tightly. Supports should be two or more (depending on the length of the ceramic pipe). Put the bags of concrete in a row, and lay a half-pipe on top, pressing it slightly so that the bags of concrete take the necessary shape. After the concrete has dried, remove the polyethylene.
- Ends of a half-pipe drown out. If you did not find ready-made plugs for pipes on sale, then you can fill a strong plastic bag with cement mortar, tie it and lay it on the edge in a half-pipe, giving the mixture the desired shape to form the butt end.
- To seal the trough, coat all seams with cement mortar.
- To prevent the pigs from climbing into the feeder, weld the grate from the reinforcing rods according to the dimensions indicated in the drawing. Secure it to the trough.

The feeder is ready!
Mobile hopper feeder (winter version)
This is a great option for winter keeping a large number of pigs in the open air. Moving such a feeder is easy, as it glides in the snow. The only condition is that the winter must be snowy.
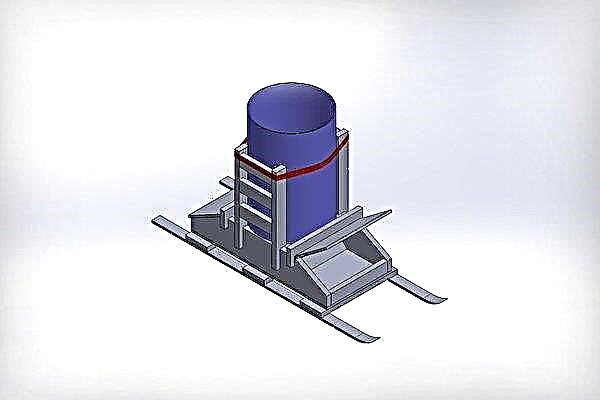
You will need:
- plastic barrel with a capacity of 200 liters;
- a pair of old skiing;
- plywood with a thickness of about 12 mm (you will need pieces of 1250 x 600 mm - 1 pc., 355 x 500 mm - 2 pcs., 550 x 600 mm - 1 pc. and 420 x 600 mm - 2 pcs.);
- 1 board 50 mm x 350 mm x 2.5 m;
- 1 board 50 mm x 180 mm x 2.1 m;
- 1 board 50 mm x 130 mm x 1.2 m;
- 1 bar 50 mm x 150 mm x 1.4 m;
- 1 beam 50 mm x 80 mm x 5 m;
- hammer and nails;
- screwdriver and wood screws;
- jigsaw;
- two sets of door hinges with a width of 7 cm;
- ratchet belt.
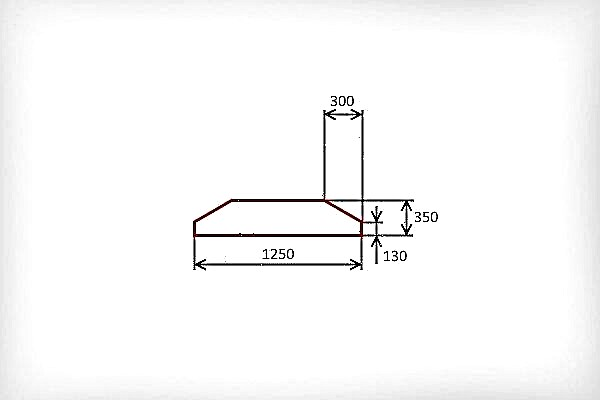
Manufacturing sequence:
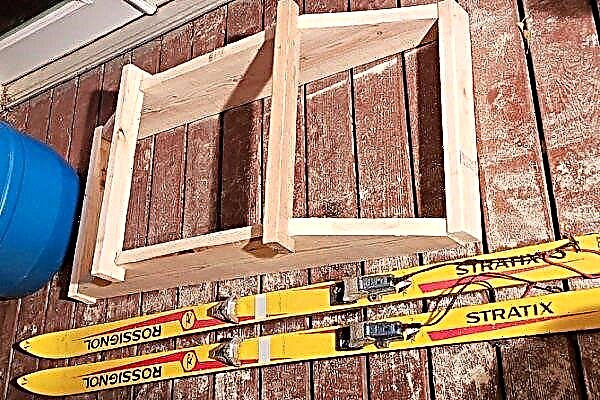
- Saw a 350 mm wide board into 2 equal parts, 1.25 m long. Cut corners on both sides according to the pattern to make a trapezoid. With the second part of the board, do the same. You will get two trapezoids like this:
- Take a beam of 50 x 150 mm, and saw into two pieces of 700 mm each. Cut out the grooves in each bar as shown in the diagram below:
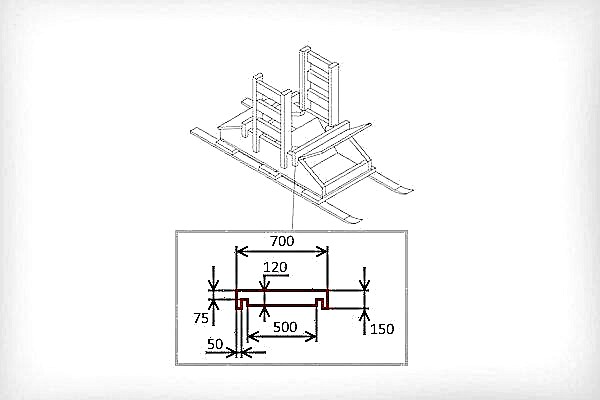
- Take a board that is 50 x 130 mm in size and saw into two pieces of 600 mm each. Connect the previously obtained two trapezoids to each other, nailing a piece of board from each end. Install in the grooves the cross members that were made from the timber in the paragraph earlier.
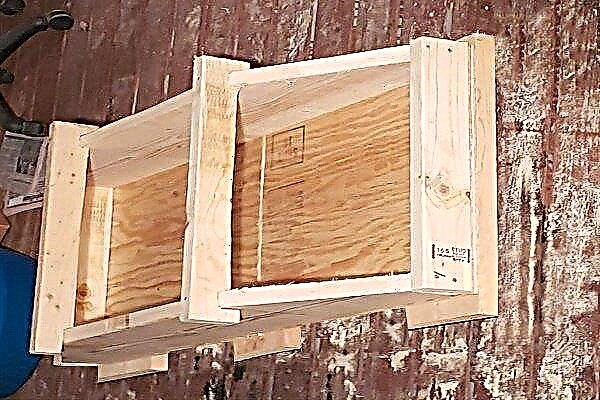
- Turn the structure over and nail a 1250 x 600 mm plywood sheet onto the base.

- For stiffness, attach the crossbeams to the bottom: on both sides and in the center. The boards should protrude slightly beyond the edges of the trough. In width, they can be any, but the wider, the more stable the design. In this case, three boards 50 x 180 mm and each 700 mm long are taken.
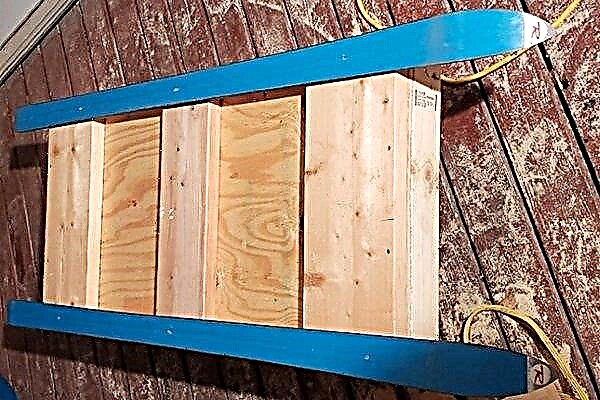
- Remove the bindings from the skis. Screw the skis to the bottom of the feeder (fix them at three points in the cross-section).
- Make a Λ-shaped structure by fastening two pieces of plywood (355 x 500 mm each) at right angles with furniture glue, and fix it in the center of the trough with an upward angle.
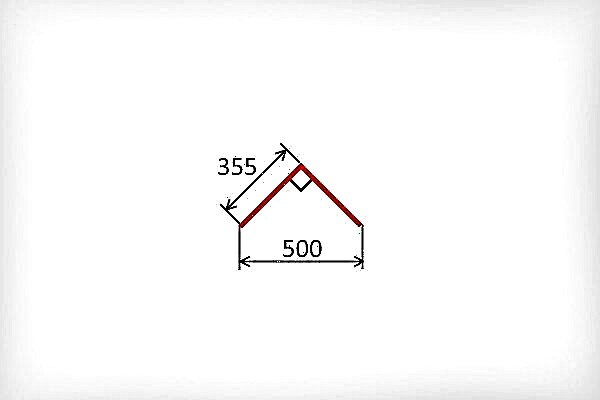
- Glue the ends of the structure obtained above with furniture glue and fix it in the center of the feeder (see photo below). Let the glue dry.
- Seal all joints in the feeder with silicone and leave to dry overnight.
- From above, fasten with a nail a piece of plywood (550 x 600 mm) with a round slot in the middle. The diameter of the slot will match the diameter of the bottom of the plastic barrel.
In the photo, the cut is made in a rough version. Then, using a jigsaw, we bring the hole in shape to the ideal.
- At the barrel, cut the bottom, leaving a bend at the bottom for better grain movement.
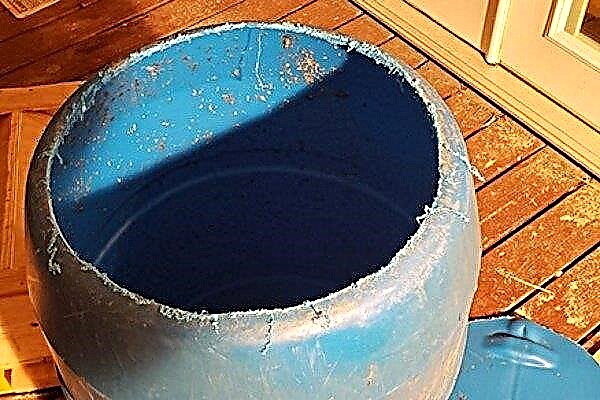
In the photo the edges of the barrel are not cleared of chips and still have irregularities
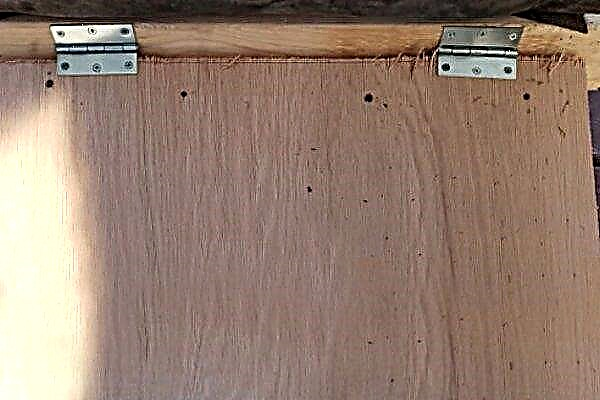
- Cut from plywood and hinge a 420 x 600mm feeder cover. Do the same on the other side.
- Fasten the barrel to the feeder. Seal the barrel / feeder joint with silicone putty. Additionally, wrap the bottom of the barrel with waterproofing roofing or other moisture-resistant material.

- To prevent the pigs from knocking over the container with the feed supply, make side supports at least 2/3 of the height of the barrel. To make such supports, you need a beam of 50 x 80 mm. Cut it into the following lengths: 4 pcs. 800 mm long and 6 pcs. 300 mm long. Cut the grooves to size as shown in the diagram below:
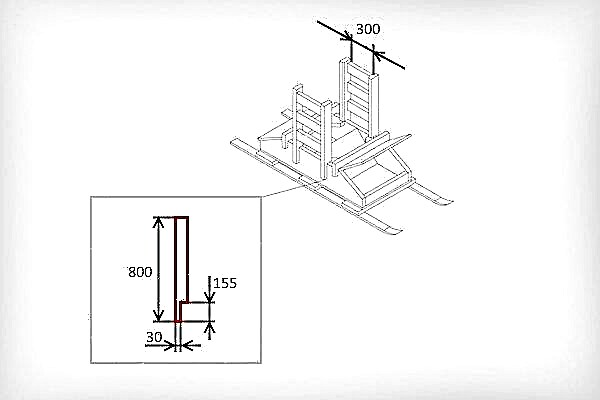
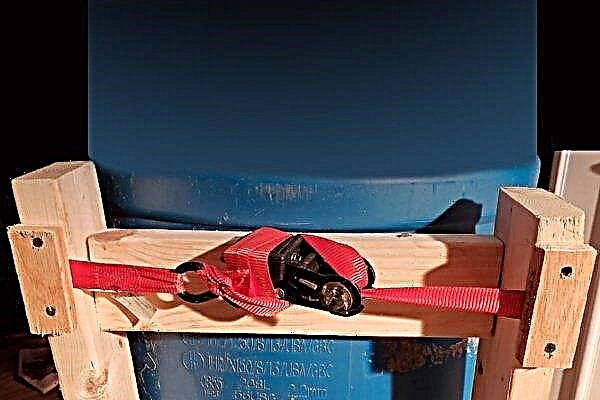
- Connect the legs with a ratchet strap (tie the remaining end of the strap around the ratchet and tie so that the ratchet does not move by itself). To prevent the belt from slipping off, fasten it with wooden blocks, on self-tapping screws.


The feeder is ready!
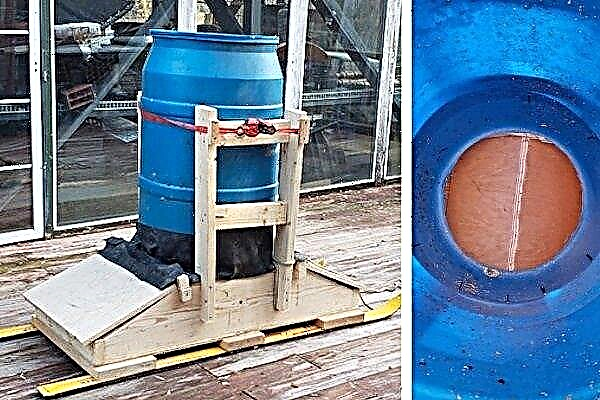
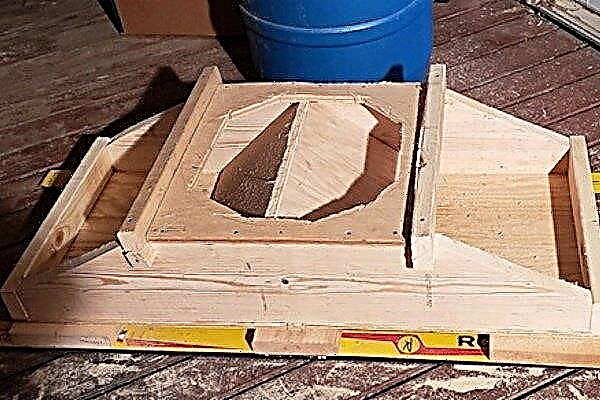
General view and top view (if you look into the barrel)
Other feeders
You can create designs for pigs from a lot of things. Water pipes made of PVC (polyvinyl chloride) have proven themselves very well:
- are created using the above technique;
- it is possible to measure the length of the future feeder by centimeters;
- low cost of material;
- ease of creation and operation.
However, the most common types are hopper feeders. They are purchased from large farms as professional equipment, but creating such a structure on your own is quite problematic.
This type of feeder is distinguished by a very complex structure: the presence of a container for creating a stock of feed, automatic feeding (with a regularly set dosage), many protective walls made of durable plastic (completely safe for people and animals; resistant to corrosion), etc.
The purchase of only one raw material to create a bunker feeder will fly into a serious penny. And if you create a design using not the best metal / plastic, then very soon the first negative effects on pigs will appear. Does the farmer need sick individuals? Not at all.
That is why it is much more profitable to buy such a feeder, and manually create more simple structures in structure.
With a responsible attitude to the process of creating pig feeders, any materials that are safe for animals will do. A competent farmer will always foresee all negative consequences, after which he will reduce the risk to a minimum. And although simple feed containers seem like a silly idea, they do their job of feeding pigs flawlessly.